Thursday, December 28, 2023

Sharing Christmas


Hello friends~  Are you all recovered from the busy-ness of the holiday?
Our Christmas turned out differently than we had planned.  Our son, daughter-in-love and sweet P all came down sick just before they were to fly home.  Allison contracted a bronchial infection and our sweet P had RSV.  Our son Christopher was the healthiest of them all, having had just a cold.  Needless to say, they didn't make it home for Christmas.  
"A man's heart plans his way, But the LORD directs his steps."
Proverbs 16:9

Perhaps The LORD has a better plan in store for us in His good timing.

Just thought I'd share some cards I made this season, that I never got around to sharing.
The Waffle Flower Postage Collage die and stencils have been such a hit this season.

I used up some bits and bobs that have been sitting in my die cut box just waiting to be used.

Various companies and so many possibilities.

This one is my favorite.

I hope you have a wonderful rest of your week!  Looking forward to the new year!!

Thanks for stopping by!


Monday, December 25, 2023

Candy Cane Lane ~ Fun with Paper on Christmas Day

Hello friends and Merry Christmas Day!  
  I have a confession to make.  I'm a bonified, certified paper hoarder.

There, I said it!  I try so hard to not buy new papers until I've used up some of my older papers that sit in a paper pile for years because A.) I like them too much to use or B.) I just have so many, I can't possibly use them all.  Especially when it comes to Christmas design paper.  I LOVE Christmas papers!  Especially Prima Marketing Christmas papers!!  They always have the sweetest vintage designs. 

 Well grab a cuppa something warm and have a seat.  Take a breather from the busy-ness of the day.  This post is filled with projects I made, while trying to use up the Candy Cane Lane collection from Prima Marketing.

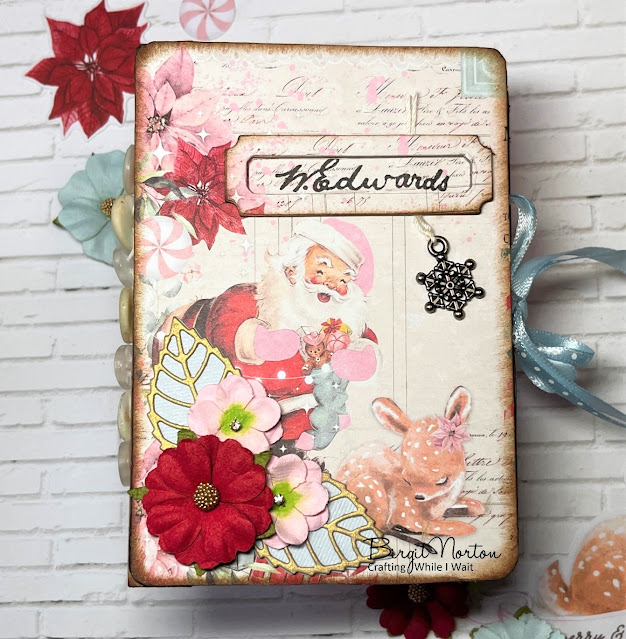
You may recall a flip album I shared using this paper last year.  If you want to have another peek, you can find it HERE.  This year I made this sweet little journal that one could document special Christmas memories and put photo's in or use it as a Christmas daily planner.  

I used Eileen Hull's Scoreboard XL Passport to create the cover and spine of the book, cut from heavy chipboard.  I covered the book with the darling Candy Cane Lane papers and embellished it using flowers from Prima and some die cut leaves in Gold and soft blue to match the stocking Santa is filling.

 
The Passport die includes the cute little name plate, which I also cut out of chipboard and covered with a scrap of the same paper I used for the front cover.  I stamped a name using a stamp from Spellbinders Sign Here stamp set from the Flea Market Finds Collection.  I tucked a tiny Tim Holtz charm beneath the name plate and a ribbon closure.

When you open the book, there are three tabbed dividers including three signatures of color matched cardstock pages.  

I added the center signature first with a simple signature stitch.  For the two outside signatures, I added old buttons to the outside of the spine, just to snazz it up a bit and add some vintage flair.  

Here's the view from the top of the book.  You can see the three signatures and variations of papers I used for the pages.

The finished size of the book measures 3 1/2" x 5".  It's the perfect size to tuck inside a Christmas stocking!

I then made three Christmas cards.

adding bits of gold glitter strips and lots of WOS.

Are these images not just as cute as can be??

Finally, I made three treat boxes.

I was so happy to use up more of this beautiful Candy Cane Lane Collection from Prima.  I still have lots of paper, die cuts and flowers leftover.  Maybe I can finish it off next year.  What should I make next??  Leave me a comment with your suggestions.  I love a good challenge.  

Thanks for sticking with me for this long post and thanks for stopping by!
Wishing you and yours a blessed and Merry Christmas!

Wednesday, December 20, 2023

Winter Church ~ Double D Challenge

Hello friends ~ This is the last challenge of 2023 for Double D Challenges.  The theme is Winter Scene.

For my card today, I used this beautiful Winter Church from Cottage Cutz, that was gifted to me by my thoughtful friend Lena.  

So many amazing details included in this die set.  I cut the entire die out of white cardstock and colored the pieces using Copic markers.  I added a bit of Tumbled Glass Distress Oxide Ink in the background to help the scene pop.

I mounted the die scene onto this silver snowflake framed card base that I had picked up at Michael's Craft Store during their after Christmas clearance sale of last year.   


Be sure to visit the Double D Challenge blog to see more amazing inspiration from the amazing design team.

Here's the inspiration photo to help you get started:

Here's the prize that you could win when you play along:

I'll also be adding this card to the Word Art Wednesday Challenge, where anything goes.  

Thanks for stopping by!

Monday, December 18, 2023

Peace, Love & Belly Rubs ~ Poppystamps

Happy Monday friends!  I've got a card for your fur loving friends over on the Poppystamps blog today.


I'd love it if you popped over for a look.

Thanks for stopping by!


Monday, December 11, 2023

Sugared Candy Canes ~ Mixed Media Monday

Hello friends ~  I've got a Mixed Media project for you today, featuring Honeybee Stamps Lovely Layers: Candy Cane Honey Cuts.  

These candy canes are pure sweetness when they're glittered up!  I started by spraying Bundled Sage distress ink onto my craft mat, dipping watercolor paper onto the mat.  After drying it with my heat tool, I repeated the process three times, finally adding Heidi Swap Gold Shimmer Spray to the mat for a final layer on the paper.  

   
I did the same thing to another piece of watercolor paper using Pine Needles Distress Ink and Gold Shimmer.  I cut the pine sprigs from the Candy Cane die set out of the first colored piece of cardstock and I cut the holly leaves out of the second colored piece of cardstock.  Using a paintbrush, I added some texture paste to the edges of the holly leaves and sprinkled them with Elizabeth Craft Designs Cool Diamond Silk Microfine Glitter.  I added a bit of white paint using a paint pen to the tips of the pine sprigs then set them aside to dry.

I cut the candy cane layers out of white, red and pink cardstock and layered the candy cane together using liquid glue.  I pressed the candy cane onto the Be Creative Embossing and Watermark Ink Pad and dipped it into WOW! Clear Gloss Ultra High Embossing Powder, quickly sprinkling it again with Silk Microfine Glitter and then heat set it again.  I love how this step really set the glitter in place.  The glitter won't rub off and it gives it a bit of an aged look.  I did the same thing to the numbers.

These candy canes look good enough to eat and the sparkle and shine on this card is amazing!  I added a bit of Copic and white gel pen detail to the berries and added just a touch of Real Red Silk Microfine Glitter around the edges.  

Here's a list of products I used today:

Honeybee Stamps Lovely Layers: Candy Cane Honey Cuts
WOW! Clear Gloss Ultra High Embossing Powder
Bee Creative Clear Embossing and Watermark Ink Pad


Thanks for stopping by!

Thursday, December 7, 2023

You Are My California Sunshine

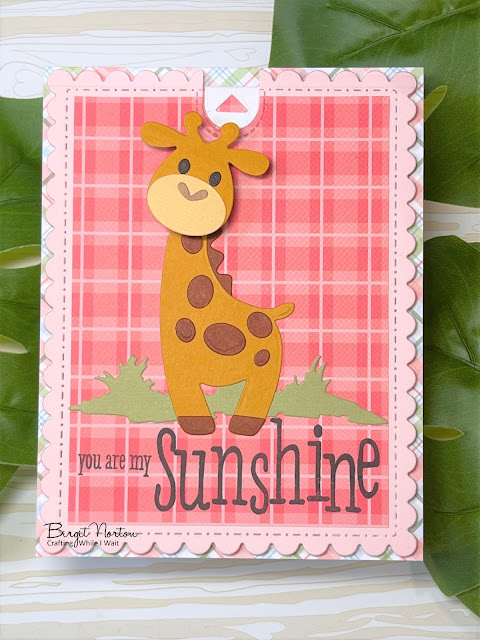
Hello friends~  Our sweet little granddaughter in California is celebrating her first birthday today and we are here in sunny California, celebrating with her!  I thought I'd share the card I made for her and a few photo's of her at the end.

If this card looks familiar, it's because I used the same technique for Mr. C's birthday card back in September.  

I love getting inspiration for cards from their children's books.  The sun pops up from behind the panel, just like in the pop-up book.  

The cutie giraffe from Marianne Designs fits my little Sweet "P" to a "T"!

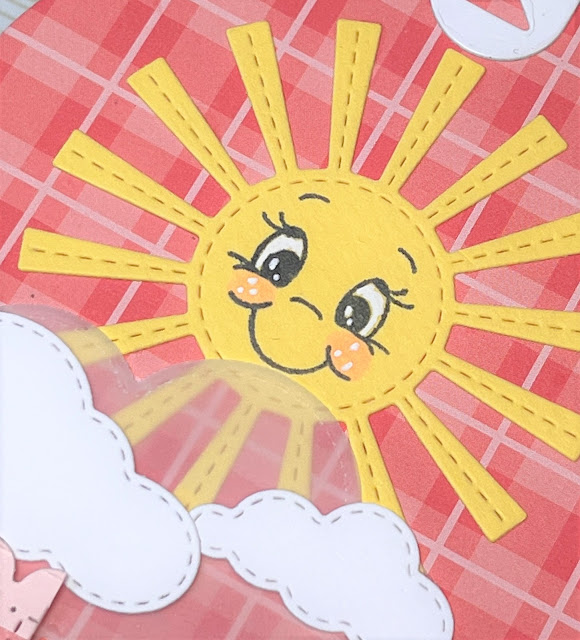
The pop-up part of the card has sunshine and clouds that are super old dies, but timeless in style.  I stamped a smiley face onto the sunshine using a stamp from Peachy Keen Stamps, adding some copic and white gel pen details.  There's a large vellum cloud and some smaller white puffy clouds.

I just love the cheerful raspberry colors and how they contrast with the giraffe.  To me, it's very story-book-ish.

Here's a picture of my Sweet "P" when she was first born.

And here she is today in all her sweetness!

Here she is with my son:

and with her mom, my beautiful daughter in-love:

I just love kissing those kissable cheeks!!  I know time is going to whiz by way too quickly and soon we'll be home again.  But, joy of all joys!  They'll be home to spend Christmas with us in just 9 days, so I might be MIA in blogland until the new year.

Thanks for stopping by!


Wednesday, December 6, 2023

Christmas Animals ~ Double D Challenge

Hey there friends!  I'm so glad you stopped in today.  Double D Challenges is starting up a new challenge today and the theme is Christmas Animals.

Who's the most famous Christmas animal that comes to mind? 

Why Rudolph, of course!

Prima Marketing Candy Cane Lane is responsible for all the cuteness on this card.  I love this line so much!!

Fly, prance or hop on over to Double D Challenges to see some amazing inspiration from my talented team of friends and then join in on the fun.

Here's the inspiration board to jump start you:

And here's the prize that you could win when you play along.

Thanks for stopping by!

Monday, December 4, 2023

Nordic Deer ~ Poppystamps

Hey there peeps!  I've got a card up on the Poppystamps blog today.  Sure would love it if you popped over for a peek.
Their line of Nordic and Scandinavian dies are so wonderful!

Thanks for stopping by!


Monday, November 27, 2023

Christmas Postage

Hello friends!  


The gals over at Sunday Stamps have a delightful inspiration board for you.  I loved the earthy tones with red and deep green, and I just happened to have recently made these two cards using those colors.  How perfect!!


My mom had these beautiful 8x8 papers of winter scenes painted by the amazing "Painter of Light", Thomas Kinkade.  I've sat on this bundle of papers for quite a few years now, wondering if I would ever use them.  Well, I'm so glad I did! I cut the front panel of the scenery using Waffle Flowers Postage Stamp die and mounted it to a panel of kraft cardstock.  I distressed around all the edges using Walnut Stain DOX ink.  I added these enamel stickers that I've had in my stash for ages.  Another box checked for using up ancient supplies!  

I popped the front panel up using foam tape, to make a slider pocket.   

 
Using the portion of the image that I had cut off for the front of the card, I made a slide out tag, adding some postage art stamps.  

I heat embossed the sentiment using chunky gold embossing powder.

I really loved how the postage die cut the panel of printed cardstock.  It looks like a page of stamps that I wouldn't dare cut apart!


The second card was much more simple than the first, as it's not a slider at all.

It's just wrapped up in prettiness!


I'll be adding one of these cards to the following challenges:

Word Art Wednesday ~ Anything Goes

Thanks for stopping by!