Pages

Pages

Thursday, June 30, 2016

Happy Little Stampers CASE the Designer July Challenge

Another month flown by and we're now into July!  I can hardly believe how quickly time goes by.  It's the first of July in Australia already so that means it's time for the Happy Little Stampers CASE the Designer Challenge.

This month Carol Steedman brings us this sweet card to CASE:

Adorable, Yes!
I went along with the little critter peeking through a window and here's the card I came up with.
I couldn't wait to ink up this cute little piggie from MFT's Hog Heaven set.

I stenciled in some bricks using the MFT Small Brick Stencil onto a Kraft card stock panel and cut the window using MFT's Window Die out of white card stock.  I added some light sponging onto the white card base and attached the brick background and window frame.  I then cut and colored this little piggie using copicss and added him to the window.  I stamped the sentiment from PTI's Flower Fusion #1 under the window sill.

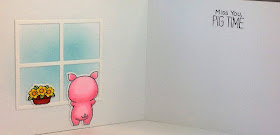
You can't just show one side of the window with such cute images as these, without showing the inside of the card too.  I repeated the process on the inside of the card and used the whole image of the piggies back side.  
I stamped the sentiment from this set onto the inside of the card.

That's it from me today!  Be sure to visit all of the designers from Happy Little stampers to see their sweet creations then be sure to join in on the fun!  You could be their next challenge winner!

Thanks so much for stopping by!  Blessings~ Birgit


Guest Designing with Time Out Challenges in A Primitive Way!

Good morning friends~  I was so surprised to discover that I was the winner at Time Out Challenges back in May so I'm happy, honored and thrilled to be posting today as the guest designer for Time Out Challenges.  This week's challenge is a CASE Challenge and here's the fabulous inspiration card from Therese Calvird :

I wanted my card to have the same design overall, but be different enough to call it my own.  I'm a lover of all things vintage and primitive, so I went in the primitive direction with my card.

I started by stamping the chicken wire image from Crafty Secrets Farm Chicks onto a piece of Primitive Cream card stock from MFT and then cut the panel using MFT's Blueprints #27.  I layered that on top of an A-2 card base that was covered with a panel of primitive check design paper that was cut using the largest rectangle from Lawn Fawn Cross Stitched Rectangles.  I like this die because it cuts a panel that covers the entire front of an A-2 sized card.  I stamped the PTI Simple Sunflowers using two shades of yellow and blending the colors on the stamp using a sponge before stamping them onto the dies.  The centers of the sunflowers were popped up with foam tape to add some dimension.  I added some MFT Royal Leaves that I cut out of printed design paper and finished by stamping just a few little dots, here and there.  The sentiment from WPlus9 Fresh Cut Florals is stamped and heat embossed in black onto a vellum fishtail banner.    

Thanks so much to all the wonderful designers at Time Out Challenges for this opportunity to join their amazing team for the week.  I hope you'll check out their blog and join in on the fun!

I'll also be entering this card into the following challenges:
Simon Says Wednesday Challenge ~ Anything Goes
Word Art Wednesday

Thanks so much for stopping by!  Blessings~ Birgit

Wednesday, June 29, 2016

Monthly Card Challenge with Marcia

Hello friends!  It's the end of the month so that means it's time for Marcia's and my monthly challenge.  This month our challenge was red, white & blue.  Perfect timing for the upcoming 4th of July celebrations.  I'll start in the order that I made my projects: 

My first card was quick and easy and is almost a one layer card.  I cut a Die-Namites Daisy Bunch from white card stock and colored it using copics and adhered it to the card base.  I then drew a black border using a ruler around the outside edge and added some tiny dots and stamped swirls from SSS Favorite Flowers.  The sentiment is also from Favorite Flowers (set no longer available).

I really like this card, I think it's my favorite.  I stamped the Kitchen Sink Multi Step Bicycle and sentiment onto white card stock and cut it using a Memory Box Stitched Rectangle.  I added a strip of striped design paper and a strip of black card stock that I added some glitz to, using a Clear Wink Of Stella.  The little red banner is cut using MFT's Blueprints #27.


Card #3~ I started by cutting and stamping PTI's Quilted Spring and mounted it onto a Tag Sale Quilted Die from PTI.  I ran the front of the card base through the embosser machine with a Lil' Inkers Circles & Diamonds Stitched Pattern Die and attached the tag to the card front.  The sentiment is from PTI's Beautiful Blessings.

This fun little treat sack was made using MFT's Paper Sack Die.  First, I printed the words to "Star Spangled Banner" onto a piece of kraft paper on my home printer.  Then I cut and assembled the paper bag, adding a handle that was cut using one of the elements from MFT's Blueprints #17.  I die cut the Die-Versions Build An Owl out of red, white and blue and assembled him, giving him a very old Quickuts Flag to hold.


This card I lovingly titled "A Crabby Hello".  It features that adorable crab from Elizabethe Craft Designs Large Shells and one of the coral elements from Elizabeth Craft Designs Seaweed.  Both of these sets have been getting a lot of use lately as they're perfect for summer cards when you live near the coast.  I layered it all up using some stitched scalloped rectangles.

That's it for my cards today.
I'll be entering one of the cards into the following challenges:
Word Art Wednesday
Simon Says Stamp Work It Wednesday
Simon Says Stamp Wednesday Challenge ~ Anything Goes

Be sure to stop by Marcia's blog to see what she came up with this month.  I'm sure her projects will knock your socks off!  They always do that to me!  
 Thanks so much for stopping by!  Blessings~ Birgit
Tuesday, June 28, 2016

Share The Love Mood Board Challenge

Good morning friends~ I'm playing catch up from a very busy weekend.  I made this card last week, for the last day of the Ellen Hutson & Winnie & Walter Share The Love challenge, and I'm just now getting around to posting it.  It was a Mood Board Challenge:
Share the love Essentials by Ellen mood board challenge
I went with the party scene in the top right corner.

Here's my card:
I used Eva's Favorite Flowers and tried to capture the look of the tissue paper starbursts.  I don't have a clue what they're really called, but I like the fun colors.  The "Celebrate" die is from PTI's Good Times set.  Some Winnie & Walter sequins add a bit of bling for a finishing touch.

I also made a card using the image of the girl in the black and white striped dress with the lime green sweater on but it didn't photograph well.  
A photographer, I am not!  ;0)  I use my iPad to take pictures and I don't even know if you an change settings on that.  

Anywhoo, I used In Bloom: Maggie's Roses Cutaways.  I had the card base all made from another project that ended up going in a different direction but the base was the perfect color for the challenge, so I used a black and white flower and the die cut word "fabulous" from MFT Absolutely Fabulous Dies.  More Winnie & Walter sequins to add some bling.  

Thanks so much for stopping by!  Blessings~ Birgit



Dies R Us ~ Butterfly House Favor Box

Good morning friends!  It's my turn over at the Dies R Us Inspiration Blog, so I'm here today with a summer project for you using some fabulous dies from Dies R Us!

I started by cutting the Memory Box Buttermilk Carton out of a pretty sky blue Bazzill card stock.  I added some fun little lattice windows using two of the die elements from Sue Wilson Designs Australian Background Die.  I LOVE THIS DIE as the possibilities for cutting backgrounds is endless!

I then adhered the lattice panels on three sides of the milk carton and added a 1" punched circle on the fourth side and assembled the carton.  

For the roof, I cut a Kraft card stock rectangle in the size I needed using my cutter and scored and folded it in the center.  I then cut several strips of scalloped borders and cut the width to fit the roof.

I then layered them onto both sides of the roof and added a little distress ink to add some depth.  


I then did some ink blending using Tim Holtz Distress Inks onto a piece of white card stock and cut the Elizabeth Craft Designs Small Butterfly from the card stock and put him together.

I decorated the front of the milk carton with a Spellbinders Corner Sprig, which is no longer available but there's some really great similar dies found HEREHERE and HERE,  some Prima flowers and the butterfly.


I used one of the Pinpoint Main Street Tags from Poppy Stamps to add a little sentiment to and attached it to the top of the birdhouse favor with some ribbon and twine.


On each of the sides with lattice, I added little Cheery Lynn Designs Nested Flower Pots that I rubbed with distress ink and added the small Spellbinders sprig and some flowers from Cheery Lynn Designs Baby's Breath.  

Here's a list of products I used that you can find at Dies R Us:


Remember, there is a new inspirational project shared each and every day of the month on our Dies R Us Inspiration Blog using a variety of dies from several different companies.
Then of course you'll want to come join us at the Dies R Us Challenge Blog  where there's a new challenge theme offered on the 1st & 15th of each month with a gift voucher prize to one lucky winner each challenge!

And did you know we have a FB Page and PINTEREST Page?

Thanks so much for stopping by!  Blessings~ Birgit
click below for:
STORE
CHALLENGE BLOG
FACEBOOK
INSPIRATION BLOG

Thursday, June 23, 2016

ColourQ and Share The Love

Happy Friday!  I'm here with a couple of cards I made for a couple of challenges going on.  The first card uses these fabulous colors from ColourQ.

I used Altenew's Peony Bouquet and the Hero Arts Prayers stamps and die set.

Share the love graphic Essentials by Ellen 2

  I used Winnie & Walters Eva's Favorite Flowers and heat embossed the sentiment onto a piece of vellum.  I have to tell you how much I adore this flower set.  The number of ways you can stamp the images from this set is infinite and there are so many stamps on this one sheet to choose from!  Definitely a set I'll be turning to again and again.

I'll also be entering one of the cards into the following challenges:

Thanks so much for stopping by!  Blessings~ Birgit  

Playing around with Flop Cards

Good morning friends~  I've been so inspired by the new Flop Dies from MFT that I just couldn't help myself to try to make one on my own using shape dies that I already have. 
Before I get started, let me warn you that this is a picture heavy post but I hope you'll stick with me through the end.  I've got four cards to share with you.

I started by finding the center of my card and drawing a very light pencil line from the left to the right side.  I then centered the shape die and only cut up to the pencil line.  


After erasing the pencil line, I scored the card where the cut ends creating the pop up portion of the card.  You can use any shape when making pop ups!

This card uses an oval die and I added Brownie the Cow from Elizabeth Craft Designs and some simple flowers from PTI's Flower Fusion.


The right side of the front folds in when you open the card.

Card #2 using a circle die and PTI's Rosie Posie.


Card #3 using a postage stamp die and PTI's With All My Heart.


And lastly, card #4 using a scalloped square die and MFT's Sketched Blooms

The inside of this card was inspired by Torico using MFT's Pop Up Birthday Dies


I'll be adding one of these cards to the following challenges:

Thanks so much for stopping by!  Blessings~ Birgit