Showing posts with label Sizzix. Show all posts

Saturday, August 16, 2025

A Sweet, Crafty Journal ~ CCS

Good morning my crafty friends.  I've got a sweet, crafty journal project up on the CutCardStock blog for you today.
 
I've used some wonderful colored cardstock from CutCardStock.
 
Plus, these beautiful printed papers and die cuts from Patchwork Roses collection from Uniquely Creative...
 
...and this amazing Snap and Swap die set from Sizzix and 49 and Market.  It is a collaboration die set, and it is a brilliant concept.
 
I hope you'll stop by the CutCardStock blog to see all the details.
 
Happy Crafting!!

Thanks for stopping by!


It's Sunflower Season!

Who here loves sunflowers, raise their hands.  I'll bet all the hands went up!
 
 
I adore sunflowers but have never been able to grow them because the squirrels either ate the seeds I planted or the ground hogs ate the flowers before they had a chance to grow tall. 
 
 
Well not this year... 
stick around to see photo's at the end of this post to see the sunflowers that are growing in my yard this year.
 
 
But first, let me share a set of sunflower cards I made using some really old (probably dated) design papers I've had in my stash that needed to be used.
 
I pulled out all the sunflower "things" to make this set of cards.  Dies from The Greetery, super old stamps from Kitchen Sink Stamps, (Do you remember them?) and a set from Sunny Studio.
 
The sentiments are all oldies as well, from PTI.
 
I packaged them all up in this sweet card box / organizer that I made using an Eileen Hull Scoreboards XL die from Sizzix.  I then wrapped them up in a cello bag and tied the tag on with a ribbon to gift to a friend for her birthday.  (She loves sunflowers too!) 
 
 As promised, here are some photo's of the sunflowers I've been growing this year. 
 
 This is a new set of four raised beds we added this spring. We purchased galvanized planters, but hubby trimmed them out with cedar and added a sitting ledge on top.  He thought that would be more comfortable for me as I get older. 😂 I filled one bed with different varieties of sunflowers.


I also planted them all along the inside edge of the garden that wraps around the south and east side of the greenhouse.
They are just starting to open up, but they're super tall.
 
Here you see two distinct colors.  Lemon yellow and the traditional orangey-yellow.
 
These smaller sized sunflowers are Teddy Bear Sunflowers.
 
Rather than having the typical elongated petals. they have very tiny outer petals and the inside is a big fluff ball... just like a teddy bear!
 
I love the darker ring of color on this sunflower.  The pollinators have had plenty to eat in our yard this year.
 
I've been a bit consumed by our gardens this summer.  I've enjoyed taking a short crafting break to spend time doing my second favorite hobby, which is gardening.  I've tried to keep up on commenting, but if I've missed some of your posts, you know why.  
The summer season is almost over and though I'm sad to see it coming to an end, I'm ready to get back to paper crafting once again.  I hope you enjoy the rest of your summer.  
 
I'll be adding one of these cards to the following challenges:
 
Beautiful Blossoms Challenge ~  Anything Goes optional mood board
 

Word Art Wednesday ~ Anything Goes
 
Thanks for stopping by!


Monday, June 2, 2025

A fun Shaped Hot Air Balloon Card ~ CutCardstock

Hello friends~  I've got a fun shaped hot air balloon card up over at the CutCardstock blog.
 

 If you'd like to stop in and take a look at the process of how it came together, I sure would appreciate your support.

Thanks for stopping by!


Friday, May 2, 2025

A Pretty Gift Set For A Special Occasion

Good morning friends~  I made this gift set back in February, to celebrate a dear friends special day, and I never got around to posting it.  As it turns out my dear friend Marcia, over at Color Hues is starting a new challenge using these colors, so I thought this would be the perfect time to post this project.

The deliciously sized cupcake die is from Pretty Pink Posh.  I added some sweet polka dotted lemons from Spellbinders because every project should have some polka dots.
 
The treat box is made using a die from Sizzix.
 
I found this striped gift bag in my stash which coordinated perfectly with the papers and cardstock colors I used.  A simply doily bag topper and bow was all it needed.  

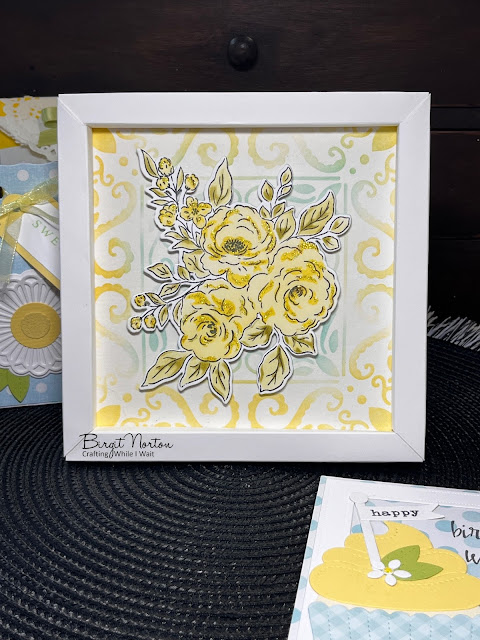
And finally, a framed piece of artwork using stencils and dies from Altenew.


I'd like to enter this card into the following challenges:
Color Hues ~ Blue & Yellow

 Word Art Wednesday ~ Anything Goes
 
Thanks for stopping by!


Wednesday, April 2, 2025

Easter Treat Box ~ Double D

Hello friends!    It's the first Wednesday of the month so that means it's time for a new challenge over at DD Challenges.  Easter is the theme for the next two weeks, so pull out your bunnies, chicks, eggs and crosses and let's get crackin' on.  (Get it?  "Eggs".... "crackin'".)  Sorry, I couldn't resist, and I digress.
 
 I made up a bunch of these dear little Easter Egg Boxes from Sizzix last year and left them undecorated, so when inspiration hit, I'd be ready to make them pretty.

  
Truth be told, I decorated this box last year as well, but never got around to sharing it on my blog, so I thought that this challenge was a good opportunity to share this project.  I still have 6 or 8 eggs waiting to be made pretty.
 
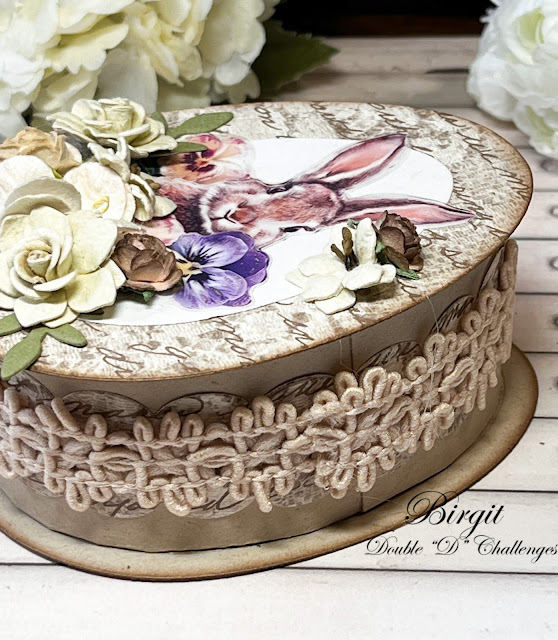
I covered the top of the kraft cardstock box with some pretty printed, vintage looking scrapbooking paper and went over the entire egg with walnut stain DOX ink.  A decorative strip of the same design paper and a length of vintage lace was wrapped around the outside of the cover. 

The bunny is a rub-on that I picked up from Amazon.  This set of vintage Easter images came with like 24 sheets of rub-ons and there are many images per sheet.  I will never in my life time have time to use them all.  I will link them HERE if you want to check them out. 

The flowers are a mix of flowers that I purchased from Really Reasonable Ribbon years ago.  I'm so glad to finally be putting some to good use.


Here's the inside of the box, ready to be filled with something sweet, I expect.


I do hope you'll stop over at Double D Challenges to see more inspiring work from the team and then join in on the fun.

Here's the inspiration tile:
 
And here's the prize you could win when you play along.

Thanks for stopping by!


Monday, March 17, 2025

Easter Treat Boxes ~ CutCardStock

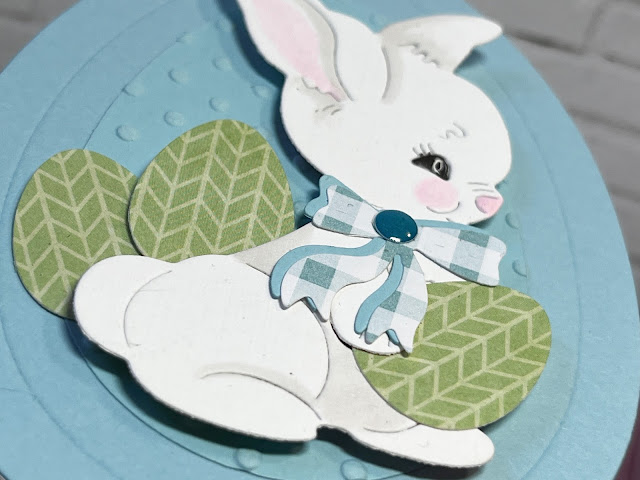
Hello friends.  I recently made these super cute Easter Treat Boxes using the Easter Egg Box die from Sizzix.
 
 
The darling Vintage Bunny is from Frantic Stamper. 


 If you want to see this project in detail, please visit the CutCardStock blog for step out instructions.
 
You'll find all the great colors of Lessebo cardstock on sale this month at CutCardStock.


Thanks for stopping by!


Sunday, December 29, 2024

A Little Ombre for Christmas

I just happened to see that the Group of Seven Card Makers started a new challenge using "Ombre" for their design element. 
 

 It just happens that I had this card that I haven't posted, where I made an ombre background using Distress Inks.
 
I used Pine Needles, Mowed Lawn and Shabby Shutters for the ombre.
 
 
 Then I spritzed it with water and ran it through my die cutting machine with a Tim Holtz pine bough embossing folder.  I gently rubbed white pigment ink over the pine boughs and added some white splatters.

The Poinsettia and Noel is also from Tim Holtz.  I added a shadow on Noel using brown glitter paper.  This card is 100% Tim Holtz products.

I'll be adding this card to the following challenges:
Word Art Wednesday ~ Anything Goes
Cut It Up ~ Anything Goes

Thanks for stopping by!


Friday, December 20, 2024

Pretty Packaging

The final countdown to Christmas day has begun!  I have so many Christmas projects that I haven't shared on my blog.  I think the posts could take me well into 2025.  
 
Today's share are these cute little gift boxes that I covered.  They reminded me of my beloved pencil box that I would get each year at the beginning of the school season.  
 
I thought these would be great for holding small gifts, but for photo purposes I filled them with chocolate.  That would make a fine gift too, I suppose!
 
 
This box is decked out with the Tim Holtz snowflake, which was a new favorite die that I got to work with this year.  It comes with these delightful ice skates.  I placed them over a vellum scalloped circle to soften the underneath.

I don't know why I have such fond memories of looking forward to school shopping and finding the perfect pencil box that would travel with me throughout the school year, as I walked to and from grade school every day.  (I lived directly across the street from the primary school, so it was very convenient.)
 
 A second box was covered using more papers from Stampin' Up.  This one with woodland animals.

This box has another vellum scalloped circle, Tim Holtz Snowflake and cute little fox from CottageCutz.
 
My pencil boxes were like little treasure chests that I would keep special things in throughout the school year along with crisply sharpened pencils, a small 6" ruler, erasers and crayons.  
 
If you've stuck with me through his post, thanks for indulging me while I reminisced of days gone by.
 
I'll be entering one of these projects into the following challenges:
Word Art Wednesday ~ Anything Goes
Christmas Kickstart Challenge ~ Anything Christmas
Cut It Up ~ Use More Than One Die
A Cut Above ~ Anything Goes

Thanks for stopping by!