Monday, July 31, 2017

12 Kits Of Occasion ~ July

Happy July 31st!  Do you know what that means?  
It's time for the 12 Kits of Occasion blog hop!!
Kim Heggins of Cupcakes, Cards and Kim was our hostess with the mostest this month and her theme was Christmas In July.

What a wonderful kit she put together to help us all get a little head start on making our Christmas Cards for this year.  
Thanks Kim for such a darling kit!  I had so much fun playing with the Christmas contents in the heat of July.  ;0)

So without further adieu, here are my cards:
 This was the first card I made.  I couldn't wait to color up this darling cat from Avery Elle's Dear Santa.  I wanted a vintage / retro look so I stenciled some stripes using Worn Lipstick Distress Oxide Ink onto a pink card base.  I added my own book die called Santa's Book by Precious Marieke, trimmed in gold. 

 This next card features the adorable little sledding girl from MFT's Dashing By.  I colored her up using copics and turned it into a shaker card using MFT's Snow Drift Cover Up.


The next two cards were made using Taylored Expressions Bethlehem Boarder.  I glued the border onto a distressed background that I had created a while ago and cut it in two.  One die doing double duty; I love it when that happens!    Kim included the wonderful sentiments which I cut using Elizabeth 
Craft Designs Stitched Banner Dies.

 This die cut sentiment is so fabulous when layered up on the sparkly paper Kim included.  I think this was the quickest and easiest card I made using fun printed papers she supplied.


I can't say enough about this wonderful coffee cup from Hero Arts "Coffee".  It's frame worthy! 

That's it for my Christmas magic today.  I still have supplies left over so I can CASE more wonderful cards from the other gals.  I always look at their cards and think "why didn't I think of that?"
 Be sure to visit the 12 Kits of Occasion Blog so see all the cards my talented teamies whipped up and do be kind and visit Kim's guest designer Ardyth from MASKerade and leave her some love as well.  

Thanks so much for stopping by!  Blessings~ Birgit

Friday, July 28, 2017

PTI Make-It Monday~ Color Blocking

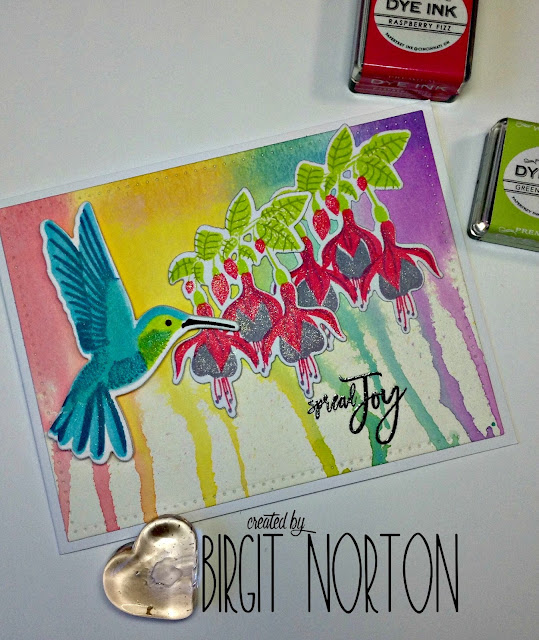
Hello there~  I'm popping in to share a card I made for the Make-It Monday challenge going on over at PTI.  Laurie Shmidlin gave us three ideas for color blocking. 

 I used Gelatos to create my color blocked background by coloring the top edge of the cardstock and then spritzing it with water and letting the color run down the front.  
This was my first time using the Humming Along set and it took me a little time to figure out how to put this darling hummer together.  In the end I added clear Wink of Stella to the wings and throat and then I stamped the body over using Versamark ink and added Mica Powder to the body.  This little guy shimmers beautifully in real life.  
I also added clear Wink of Stella to the fuchsia's.   
You can find all the details and see Laurie's video HERE.

I'll also be adding this card to the following challenges:
Word Art Wednesday ~ Anything Goes
AAA Cards ~ Rainbow

Thanks so much for stopping by!  Blessings~ Birgit

Elegant Wedding Card

We're well into wedding season and since this month's sale at Cut Cardstock includes all Gold & Silver Cardstocks and papers, I thought I'd inspire you with an elegant wedding card.  


 Here's a snapshot of the products I used in today's project:

 I started by cutting the largest Sue Wilson frame die out of Cougar White Super Smooth 80lb Cardstock and then cut a piece of CCS 54lb Gold Glitter Paper 1/2" larger than the white frame and layered the two using Score Tape.  

I repeated the process as above using the fancy Sue Wilson oval frame and layered them in the same manner.  

I backed the ovals with a piece of matte board to add depth and attached it to the rectangle frame.

As I was in the process of designing this card, I decided I need to create a tag for the sentiment.  I chose this fancy shape which is actually a Christmas ornament die from Elizabeth Craft Designs.  This is part of a new release which you'll be seeing more of soon.  ;0)    I stamped the sentiment onto the tag and gently ran the edge of the die through a Versamark Ink Pad and then heat embossed it with gold embossing powder.

I added this pretty trio of Prima Flowers using Glue Dots and tucked the sentiment tag and bow under the cluster of flowers.

Be sure to visit the Cut Cardstock store and stock up on Gold & Silver cardstocks and papers while it's on sale for the month of July.  

Thanks so much for stopping by!  Blessings~ Birgit

Tuesday, July 25, 2017

PTI ~ July Blog Hop

Good morning friends~ It's been quite a while since I've joined PTI's monthly blog hop so I'm happy I was able to get a card done and join in on the fun this month.  


Here's the inspiration for this month:
Blog Hop Inspiration

I used Beautiful Butterflies, Beautiful Butterfly Layers, Background Basics Text, Postmarks and Banner Style for the sentiment.

I stamped the images onto white linen cardstock and cut the edge using a stitched edge die.  To go along with the postal theme I added the script background to the bottom of the card.  I popped the sentiment banner up with foam squares.

I'll be adding this card to the following challenges:
Simon Says Monday ~ You've Got The Edge
Word Art Wednesday ~ Anything Goes
Work It Wednesday ~ Summer Icons

You can find all the details on the July blog hop HERE.

Thanks so much for stopping by!  Blessings~ Birgit

Thursday, July 20, 2017

PTI Make-It Monday ~ Emboss Resist

I'm so happy to be joining the fun at this week's Make-It Monday with Ashley.  I loved her technique for creating a shadow using heat embossing!
I used Gran's Garden for my card.  If you look closely you'll see that I used two colors of distress ink.  That was a happy accident.  

 I started by using Fossilized amber but it was way too dark and contrasted too much with the raspberry fizz that I stamped my sentiment in.  I was going to throw it away anyway so I figured I'd spray it with some bleach and water and it almost disappeared before my eyes.  While it was still wet, I went over very lightly with Tumbled Glass and I just love the results! You can see a little of both colors.
  And what do you think of my new photo's?  I'm trying so hard to make my photo's look better.  I'm so inspired by everyone's amazing set ups they do when taking photo's of their cards.  I don't have much in the line of props, nor do I have good photography skills.  I use my ipad to take photo's and I notice that the small details get lost.  For example, I used linen cardstock on this card and you would not know it to look at the picture. 

Anyway, I'm so glad you stopping by for a visit!

I'll be adding this card to the following challenges:
Word Art Wednesday ~ Anything Goes
Simon Says Wednesday ~ Seeing Stars
Work It Wednesday ~ Add Sparkle

Blessings~ Birgit

Tuesday, July 18, 2017

Elizabeth Craft Designs July Designer Challenge

Good morning friends~  Elizabeth Craft Designs has a new challenge for you today and you get a real treat as we've combined the challenge using both the Die Cut Design Team and the Coloring Design Team.  Just think of the inspiration you'll find!

Today's challenge is:  Technique Friday with Els Inspiration - Every Friday Els inspires us with a new Technique Friday video to share all the wonderful ways to use ECD products. Take your inspiration to create your card for our challenge using one of these techniques. You can find a list of all the Technique Friday with Els videos here … Technique Friday with Els

I used the Jungle Cuties Spinner Card video but made mine using using Joset's sweet dolphin die.

Here's how I made my card:
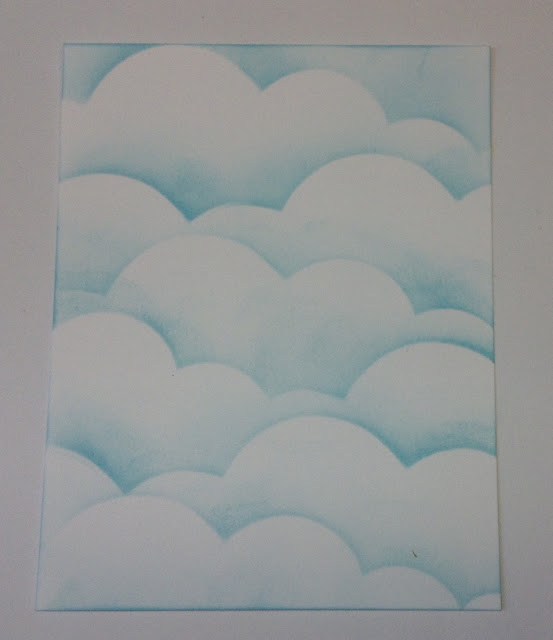
I started by creating a cloudy background using a die cut cloud out of heavy cardstock and distress ink.
I cut 4 layers of waves using the wave die from Joset's Boat set and added color using Broken China Distress Oxide Ink.  I then adhered the top three layers together.

I adhered the largest wave onto the front of the cloud panel and cut the slider die out, setting the negative strip aside.

I then adhered foam tape to the back of the wavy panel as well as the cloud panel, making sure that there was enough space around the slider slot for the penny to glide smoothly.  

I cut the Dolphin out of white Soft Finish Cardstock and added color using Distress Inks.

I lined up the top panel with the card front and glued the negative piece from the slider on to the front of the card.

I then added a foam square to a penny, fit it into the slider and finished mounting the front panel to the card front.  I also stamped the sentiment from Ahoy Sentiments to the top left corner of the card front.

I adhered the dolphin to the top of the foam mounting square and and the waves to the front of the card.  I added the splashes of water to the front of the card as well to finish it off.
  
The dolphin looks like he's jumping out of the water.  A fun summer slider card! 

I hope you'll check out some of Els Technique Friday video's and the Elizabeth Craft Designs July Design Team Challenge and join in on the fun!

For today's challenge Elizabeth Craft Designs are giving away a $20 Gift Card to use on our website to 3 winners

To enter simply leave a comment on the Elizabeth Craft Designs Challenge post and tell us " "What your favorite technique learned from the Technique Friday With Els series". 

We will select 3 lucky winners in a random drawing. 

The winners will be announced on Friday, July 21 on the Elizabeth Craft Designs blog.

Thanks so much for stopping by!  Blessings~ Birgit

Friday, July 14, 2017

Butterfly is Proof...

Hello ~ I couldn't let the color challenge from Color Throwdown pass me by as they're just too yummy to resist!


I created my top panel by scoring lines every 1/4 inch, adding the smaller Elizabeth Craft Designs Romantic Corner to opposite corners and then cutting the panel using a Stitched Rectangle.  What a pretty base this makes for any type of card!  

I used the Misti to stamp the sentiment from The Butterfly Is Proof a couple of times, making sure it had good coverage over the scored lines. At first I was thinking this card was done but then I decided it needed a little more.  I have a very hard time sticking with CAS cards.

I had this Garden Notes Aster left over from a previous project and the colors still fit within the challenge, so I used it.  I added a few leaves from Garden Notes Tulip that were left over as well and then some fun Flower Pot Prills.  These Watermelon Sequins were the perfect finishing touch!

I'll be adding this card to the following challenges:
Work It Wednesday ~ Summer Icons
Crop Stop ~ July Linky Party
Word Art Wednesday ~ Anything Goes

Thanks so much for stopping by!  Blessings~ Birgit

Thursday, July 13, 2017

Oceans Of Joy

Being at the ocean is just part of what makes summer wonderful!  I've got a quick and easy summer card for you today.

Here's a snapshot of the dies I used to make this card.

I started by creating a cloud background by cutting a Frantic Stamper Stitched Cloud Edger and using one as a stencil, along with some Tumbled Glass Distress Ink.  

Next I cut 4 panels of blue cardstocks in graduating colors using the Impression Obsession Ocean Border and layered them from lightest to darkest and then adhered them to the cloud background.  
I cut the front panel using an Elizabeth Craft Designs Stitched Rectangle.  I then heat embossed the sentiment from Elizabeth Craft Designs Ahoy Sentiments in white on the bottom wave.

I cut the Impression Obsession Patchwork Whale out of grey cardstock and assembled him using Glossy Accents.

 I nestled the whale between the two top waves using Glossy Accents to finish the card.


Here's a list of products I used that can be found at Dies R Us:
Impression Obsession - Dies - Patchwork WhaleFrantic Stamper - Dies - Stitched Cloud EdgersImpression Obsession - Dies - Ocean BorderElizabeth Craft Designs - Stitched Rectangles

I hope you're inspired by today's project.  Don't forget to join in on all the fun at the Dies R Us Challenge Blog.  There's a new challenge theme offered on the 1st and 15th of each month and one lucky randomly drawn winner will receive a gift voucher prize to the Dies R Us Store.  For your convenience, all the important Dies R Us links are provided below.

Thanks so much for stopping by!  Blessings~ Birgit