Showing posts with label Glimmer Hot Foil. Show all posts

Thursday, October 19, 2023

Sending Hugs & Hello ~ The Flower Challenge

Hello friends~  I thought I'd pop in and share a couple of cards that I made that fit perfectly into the Flower Challenge to celebrate their 7th anniversary.

 
Gina K Lovely Notes and Peony Fantasy from Pinkfresh Studio share center stage on these two cards. 

I had used PinkFresh Studio Peony Fantasy Hot Foil Plate and Gold Foil to create the flowers, adding color using the coordinating stencils and distress oxide inks.


The gold foiling adds a beautiful touch of elegance to these cards.  The darling birds from Gina K's Lovely Notes are just adorable, colored in coordinating colors using Copic Markers.  I added white gel pen details.

The sentiments are included in the Lovely Notes set, complete with coordinating dies.

Join in on the celebration at The Flower Challenge.  
I'm also adding this card to the Word Art Wednesday Challenge ~ Anything Goes

Thanks for stopping by!


Thursday, June 22, 2023

It's My Party Too! ~ Spellbinders

Good morning friends~  Spellbinders recently had another amazing release called "It's My Party Too!"  It's a fun collection worth celebrating, which compliments the Birthday Celebration collection that was released last year.  

I had the opportunity to work with Glimmering Hooray Hot Foil Plate and Tiny Dots Embossing Folder, which I paired with Color Block Balloons Etched Dies.

Card #1:  I started with the Glimmering Hooray Hot Foil Plate, foiling it three times, in the colors Gold, Skybright & Moondust, then die cutting each of them out using the coordinating sentiment die.  

Focus:  I cut the Color Block Balloons out of shimmery white cardstock, black glitter cardstock and gold mirror cardstock and layered them up as you can see here.  They are mounted on a piece of gold script design paper from one of the previous Card Kit Of The Month.

Card #2:  I used the Tiny Dots Embossing Folder to create the simple background.  The color foil on this card is called Moondust.  I love how the iridescent colors change in the light.  It's hard to capture a good photo of the glimmery colors.

Card #3:  Using the leftover piece of design paper, I added it to the left side and cut a slim strip of coordinating paper to add definition to the background.  The colorblock balloons were then layered in a playful design, with the Skybright sentiment placed on top.

I hope you enjoyed today's cards and I especially hope that you'll stop in at Spellbinders to see their New Release. 

I've linked the products I used below for your convenience.

Spellbinders
It's My Party Too!
Glimmering Hooray Hot Foil Plate
Tiny Dots Embossing Folder
Color Block Balloons Etched Dies
Hot Foils:  Gold, Moondust & Skybright


 While you're there, be sure to check out what's Coming Soon.  They also have a wonderful selection of products on Clearance.  

Thanks for stopping by!


Saturday, March 11, 2023

PinkFresh Studio Floral Trio ~ Scrapbook Pal

The month of March can be cold and wet here on the east coast, so I was very happy to be able to work with the beautiful Floral Trio release from PinkFresh Studio this month.  These flowers helped me see past the dirty snow, looking forward to the new growth that spring brings.  

Lets jump right in on how this card came together.

I started by using the PinkFresh Studio Floral Trio Hot Foil Plate using Silver Glimmer Hot Foil.  I foiled it three times, using the Spellbinders Glimmer Foil System, twice onto white cardstock and once onto black cardstock, because I didn't have a plan mapped out yet and I wanted to have options.


Using the PinkFresh Studio Floral Trio Stencils, I started adding color to the foiled  white cardstock panels.  I stenciled one using Spun Sugar, Kitsch Flamingo, Twisted Citron and Mowed Lawn DOX Inks.  I used Squeezed Lemonade, Mustard Seed, Crushed Olive and Peeled Paint DOX Inks on the second white cardstock panel.  You'll see that project below.  

Next, using the PinkFresh Studio Floral Trio Die, I cut a scrap piece of cardstock so that I could use the negative shape to mask off the stenciled portion of my card front.  I then blended Tumbled Glass DOX Ink around the outside edges of the floral spray.

I then stamped a sentiment from the PinkFresh Studio Floral Trio Clear Stamp Set onto the bottom left corner of the card front.  

I finished this card off by framing the image in black cardstock and then mounting it to a soft pink A2 size card base.  

I die cut the yellow floral spray using the Floral Trio Die and mounted it to a pretty piece of 6x6" patterned paper that was left over from one of the 12 Kits of Occasion  and made a frame using the Spellbinders Shadowbox Frame Die.

Some Yellow Stickles on the details of the flowers finished this project off nicely.

I loved how the gold foil on the black cardstock came out so I simply trimmed a bit off the edge so I could add some striped scrapbook paper and gold gems.  Easy peasy!

Here is a list of products I used that can be found in the Scrapbook Pal shop:

PinkFresh Studio Floral Trio Hot Foil Plate

PinkFresh Studio Floral Trio Stencils

PinkFresh Studio Floral Trio Clear Stamps

PinkFresh Studio Floral Trio Dies

Spellbinders Glimmer Hot Foil System

Spellbinders Silver Glimmer Hot Foil

Distress Oxide Inks

Yellow Stickles

I wish you the happiest spring season!  


Thanks for stopping by!


Saturday, January 7, 2023

Pinkfresh Studio Phrase Builder: HAPPY ~ Scrapbookpal

Hello friends~  I'm up on the Scrapbookpal blog today with a sweet project featuring Pinkfresh Studio Phrase Builder:  HAPPY.  

Phrase Builder:  HAPPY Hot Foil Plate is a 9 piece set of sentiments that will cover just about every occasion you could possible need, including Mother's & Father's Day, holidays, anniversary, birthday and more.  

Since Valentine's Day is just around the corner, I chose to use the Happy Valentine's Day sentiment plates with my Spellbinders Glimmer Hot Foil Systemusing Rose Gold Glimmer Hot Foil on smooth white cardstock.

I paired the Phrase Builder Plates with Pinkfresh Studio Citrus Bloom Clear StampsStencils and Dies to create my card. I used Distress Oxide Inks to stencil the images.  I've listed all the colors I used below in the supply list.

The A2 sized card base was created using Altenew's Brushed Rose Metallic Cardstock, polka dotted vellum and 80lb smooth white cardstock.  The Brushed Rose cardstock is the perfect match for the foiling.  Love it when that happens!  I used Scor-Tape to adhere each layer together, except for the layer of vellum, where I used Scrapbook Adhesives EZ Runner Vellum Tape.

I adhered two flowers flush to the front of the card using Bearly Art Precision Craft Glue and two flowers were adhered using Scrapbook Adhesives 3D Foam Squares to add dimension.


Thanks for stopping by!


Thursday, January 5, 2023

You're Doing A Great Job! ~Celebrating Marcia

Good morning friends!  Color Hues just started a new challenge and I couldn't let these colors pass me by without playing along for two reasons.

Reason #1:  My dear friend Marcia, from Marcia's Stamping Pad recently became one of their design team members and I wanted to celebrate with her.

Reason #2:  The color palette is gorgeous!

I started by hot foiling the Charming Floral Border Hot Foil Plate, using Gold Foil onto smooth white cardstock.  Using the coordinating stencils, I sponged on Spun Sugar DOX Ink.  I took a little liberty here and added Squeezed Lemonade to the flower centers, thinking they were going to come out soft and barely noticeable.  Well, they're noticeable!    If this isn't in keeping with the rule at Color Hues, I understand if you have to remove my entry.

I cut graduating circles out of pink, gold mirror and white cardstock and found this pre-foiled sentiment from PinkFresh Studio Foiled Sentiments in my die cut box.  I thought this sentiment was perfect to celebrate Marcia's joining the design team.

I layered all the elements onto an A2 size vellum card base.

To make the flowers stand out a little more, I added a white cardstock panel to the back panel inside the card, so when the card is closed, you can see it as a soft background.

I hope you'll join in on the fun over at Color Hues and celebrate all their new designers, as they have three new members!

Here's a list of products I used today that can be found over at Scrapbook.com!

Pinkfresh Studio Charming Floral Border Hot Foil Plate
Pinkfresh Studio Charming Floral Border Layering Stencils
Pinkfresh Studio Charming Floral Border Die
Spun Sugar Distress Oxide Ink
Squeezed Lemonade Distress Oxide Ink
Pinkfresh Studio Foiled Sentiments
Gold Mirror Cardstock
Spellbinders Glimmer Hot Foil System
Spellbinders Gold Foil

Thanks for stopping by!


Friday, June 17, 2022

More of "Just Wanted To Say" from Spellbinders

Hello friends~  I'm back with a couple more cards I made using Spellbinders "Just Wanted To Say" collection.

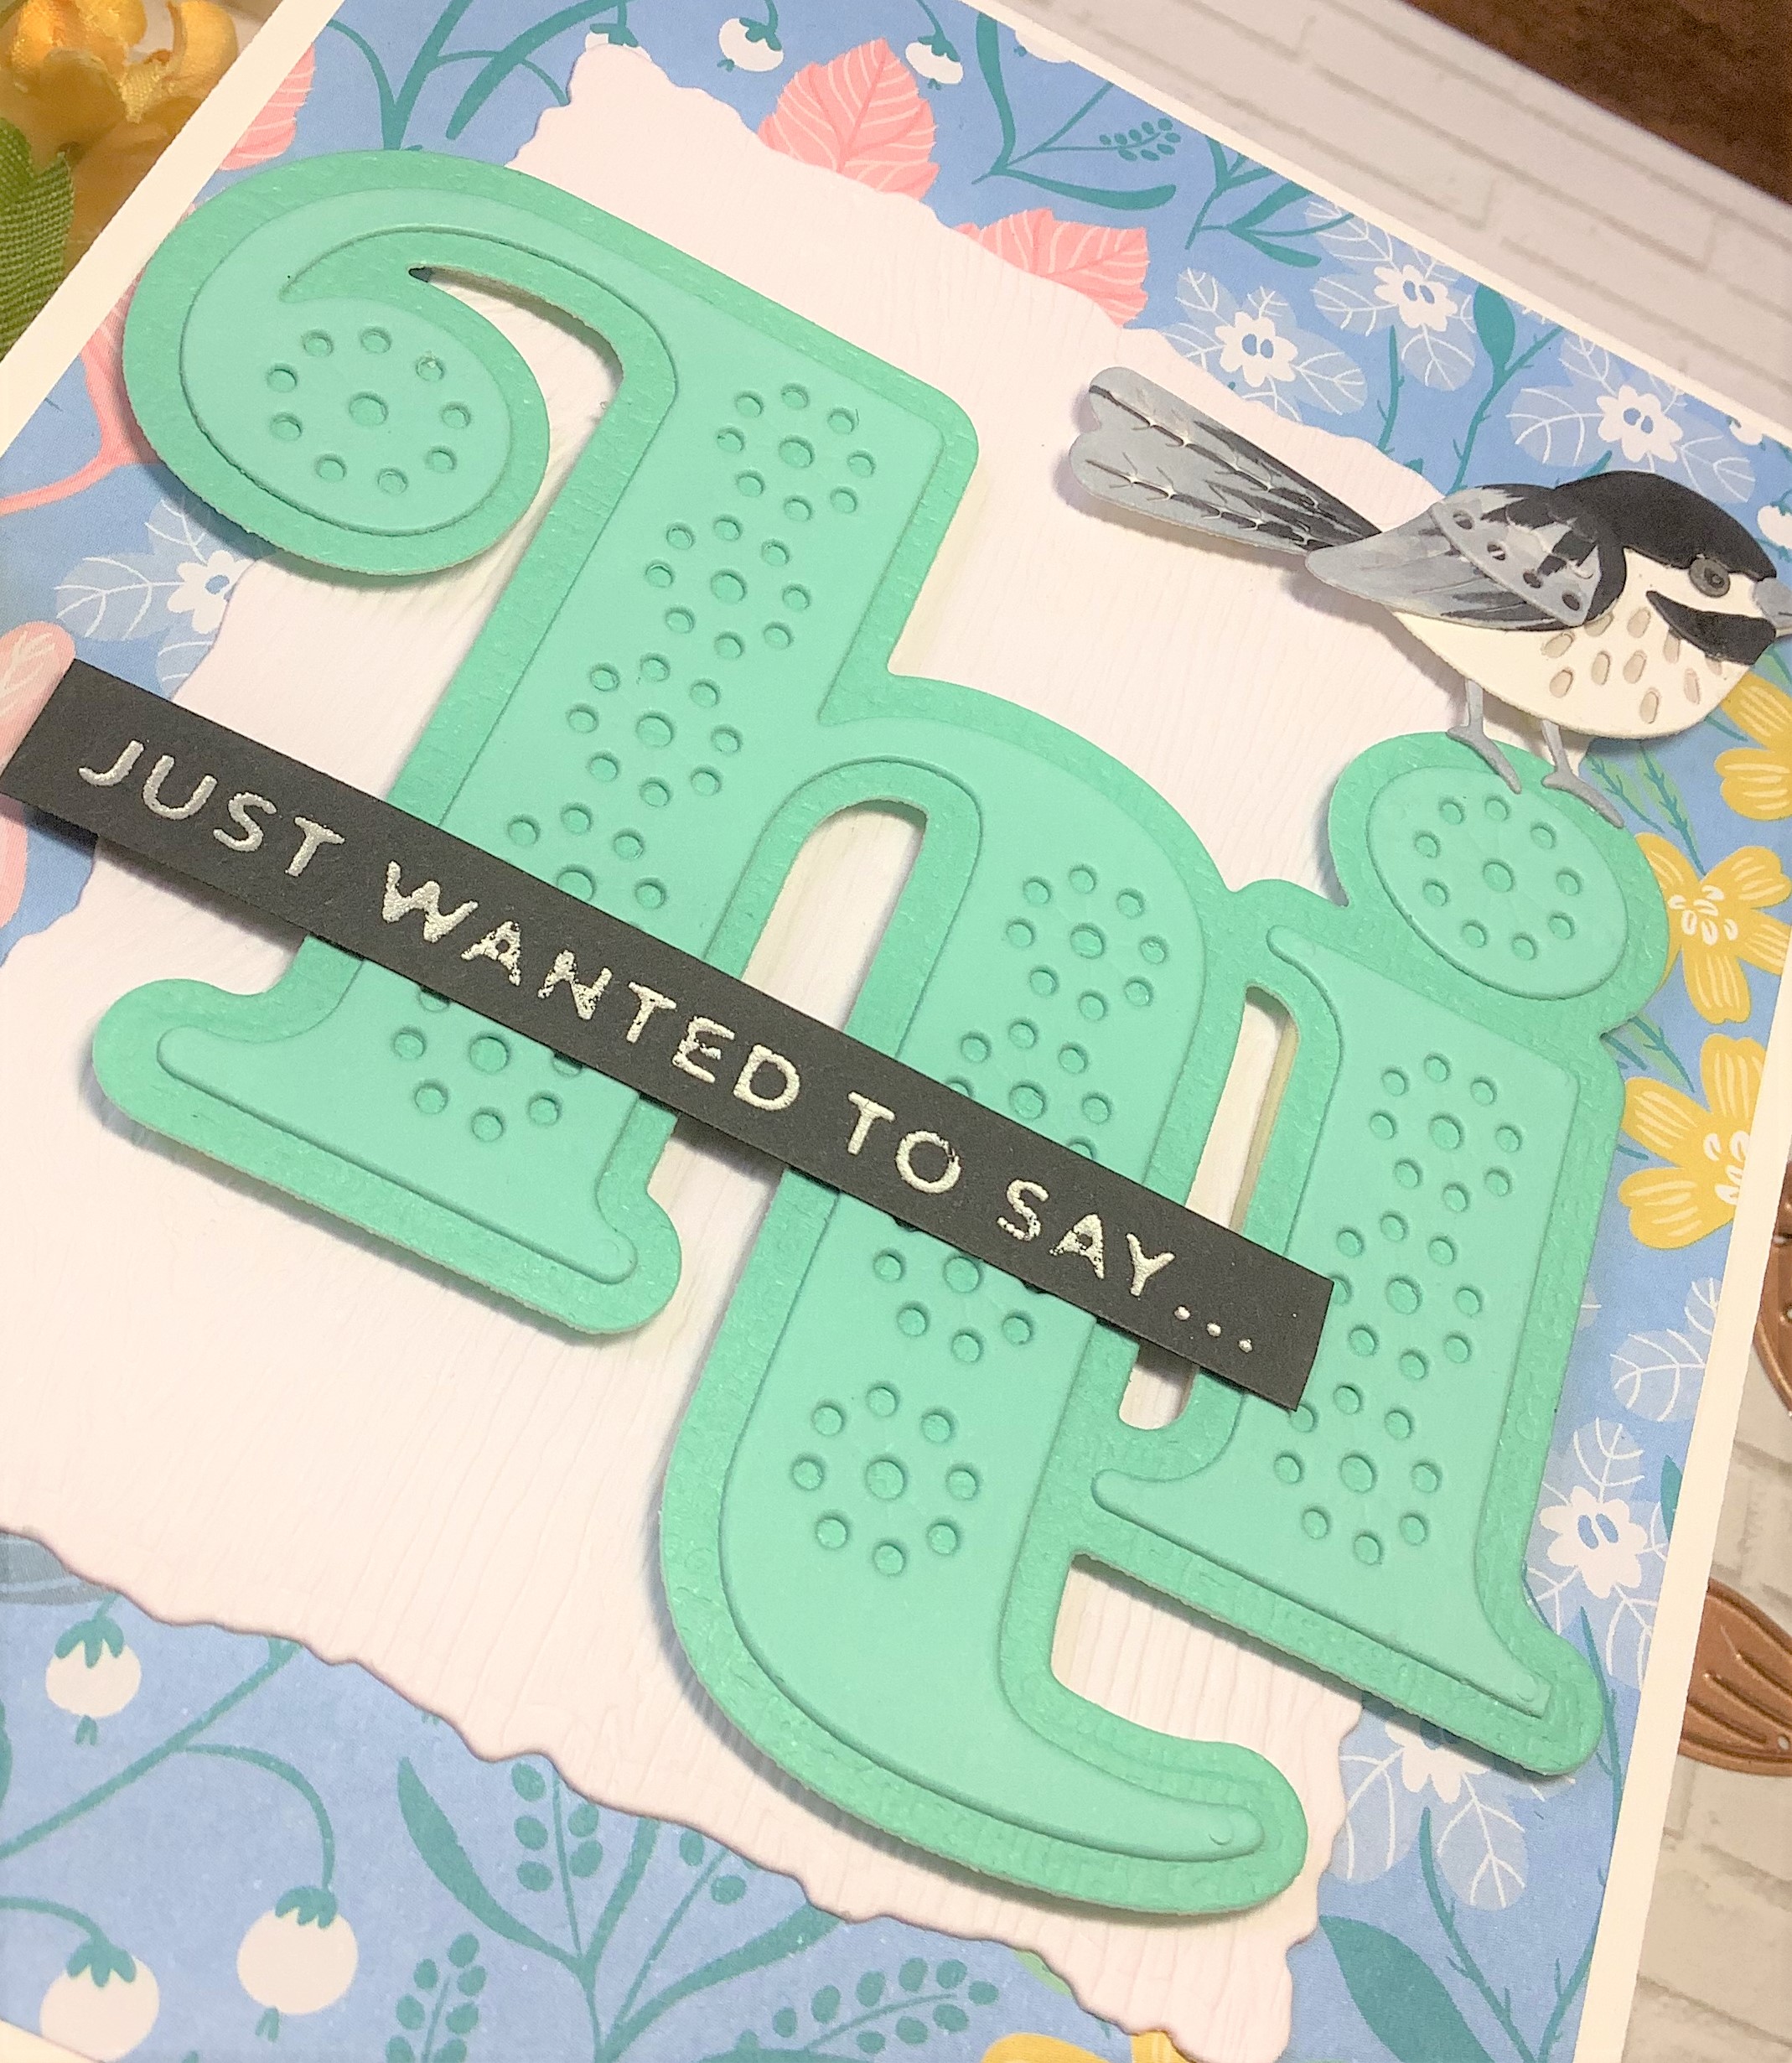
For this card, I cut the "Little Chickadee" out of yellow cardstock and added more detail using Copic markers.  I die cut the "Stitched HI" and layered them, without adding any stitching. 

Instead of adding the stitching to the letters, I adorned the letters with flowers that I cut using dies from the Picket Fences Card Kit of the Month.

I think this card turned out so cute!


I wanted to get a little more creative designing the bird for the second card.  I'm not sure what type of bird this would be, but if he looks familiar, let me know in the comments.

Spellbinders is celebrating their 20th anniversary all month long, so be sure to visit their website to see all the pretty new things and take advantage of their big sale and other discounted items.


Here are some handy links that will bring you directly to the products I used today:

I hope you enjoyed today's card
  Please visit Spellbinders to see all their NEW ARRIVALS and take a peek at what's COMING SOON.

Thanks for stopping by!


Thursday, June 16, 2022

"Just Wanted To Say"... ~ Spellbinders

Hello friends~ Do you enjoy feeding and watching the birds in your back yard?  I do!  Today, I'm introducing you to the new Spellbinders release, "Just Wanted To Say" collection.  Just Wanted to Say Collection is a gathering of sweet designs and sentiments to help you make creations that will perk up someone’s day. The mix of cutting dies, hot foil plate and stamps will help you to accomplish just that! 

This collection is pure delight!  I adore this sweet little bird called......... 
 "Little Chickadee".  This is a set of 8 cutting dies that you can use to make your bird in any color you'd like.  Given the name, I designed the first bird to look like a Chickadee.  I cut the bird out of white cardstock and colored the pieces using Copic markers.

 The Little Chickadee is perched atop the Stitched "Hi" die set.  These dies are wonderfully detailed on their own, so you can choose to either stitch them or not, the choice is yours!  I completed the sentiment using the "Just Wanted To Say" Glimmer hot foil plates.  

The next card, I decided to make the Little Chickadee using yellow cardstock, adding more Copic marker details.  

The papers I used in the backgrounds are papers from previous Card Kits.

There are 8 different sentiments to choose from in the "Just Wanted To Say Glimmer" hot foil plates.  You'll never be at a loss for words.  

Here are some handy links that will bring you directly to the products I used today:

I hope you enjoyed today's card
  Please visit Spellbinders to see all their NEW ARRIVALS and take a peek at what's COMING SOON.

Thanks so much for stopping by!