Showing posts with label ScrapbookPal. Show all posts

Tuesday, October 24, 2023

Sweet Honey Note ~ ScrapbookPal

What could be sweeter than sending a handmade card to someone just to brighten their day? 

Lawn Fawn makes it so easy to do just that!  I created this “sweeter-than-honey” card using Lawn Fawn Magic Iris Beehive Add-on Die set along with More Magic Messages clear stamp set.

I added some distressing to the edge of the beehive and center medallion and some Copic and gel pen details to the bees, flowers and leaves.

  I love how Lawn Fawn products can be intermingled and always coordinate perfectly.  Find them now at ScrapbookPal.


Thanks for stopping by!


Saturday, October 7, 2023

Sugar Is Sweet ~ ScrapbookPal

Hello friends!  Today's project is super sweet in every way, using products from Honeybee Stamps, that I found at ScrapbookPal.


Let me introduce you to Honey Bee Stamps Lovely Layers: Fall TreatsIf you have a sweet tooth, this set is for you!  This die set is filled with iconic candy shapes like Swedish Fish, Gummy Bears, Candy Corn, wrapped candies, jelly beans and more!   

I started by cutting out several of the candy dies in soft, pastel colors that coordinated well together.  Some of the candies have two layers, so once I glued them together using Bearly Art Precision Liquid Glue, I went around the edge of each candy with coordinating Distress Oxide Ink using a blending sponge.

  The dies have etched details, which give them a realistic look.  I also added some accents using a white gel pen.

Once the candies were done, I moved on to the card front.  I created a frame using the Honey Bee Stamps Fancy Fall Layering Frames by inlaying the large oval frame inside the large rectangle frame die.  I cut the frame out of warm yellow cardstock.  These dies have beautifully embossed details!  
  
To enhance the details, I used a Ranger Ink Distress Brayer and rolled Mustard Seed Distress Oxide Ink over the top of the embossed frame.  This really made the details in the frame stand out.

I then started gluing the candies over the top of the frame in a random pattern, keeping a balance of colors around the frame.  I stamped the sentiments from Honey Bee Stamps Mini Messages: Sweets and adhered them using Scrapbook Adhesives Foam Squares to add dimension to the card. 

This card sure made my mouth water!  It came out super sweet!

Here's a list of products I used that can be found at ScrapbookPal:

Honey Bee Stamps Lovely Layers:  Fall Treats
Honey Bee Stamps Mini Messages:  Sweets
Honey Bee Stamps Fancy Fall Layering Frames
Distress Oxide Ink
Ranger Ink Medium Distress Brayer
Foam Squares
Bearly Art Precision Liquid Glue


Thanks for stopping by!

Saturday, September 16, 2023

Make It Merry Holiday Card & Tag Kit ~ ScrapbookPal

Have you ever purchased a card making kit?  The Make It Merry Limited Edition Holiday Card & Tag Kit is one you won’t want to miss! I'd like to show you how I get acquainted with, and create cards & tags using this Spellbinders kit, available at ScrapbookPal

Let’s get started.  


There are loads of die cuts, stickers, sequins, gems, card stock and two sizes of pre-folded cards and envelopes included in this kit, plus so much more. I start by removing all the pre-printed die cuts and sorting them out on my table so I can have a clear view of what’s included in the kit.  Just look at all that holiday goodness!


I then start layering the die cut elements together, creating cluster focal points using Bearly Art Precision Craft Glue and Foam Squares to add dimension. 


Once I feel happy with the focal clusters, I add them to card fronts that have been covered with the design paper that is included in the kit.


I also like to add twine as well as other embellishments from the kit.


Some of the card fronts are layered with different papers.  See how I added movement to the banner by giving it a slight bend and adding liquid glue to each side of the banner.


There are endless possibilities in this kit!


I also made some gift tags, and I go through the same process to make the tags.

I used the Tim Holtz Framed Tags to cut the smallest size tag and added lots of die cuts and foam stickers, finishing them off with some twine.


I have tons of supplies left over, enough to make oodles of cards and gift tags for the holiday season.

I hope you’re inspired to pick up this card kit today and let the fun begin.  


Here’s a list of products I used today that can be found at ScrapbookPal:

Spellbinders Make It Merry Limited Edition Holiday Card & Tag Kit
Tim Holtz Framed Tags
Bearly Art Precision Craft Glue 
Foam Squares


Thanks for stopping by!

Wednesday, September 6, 2023

Pop-Up Shoppes ~ ScrapbookPal

Hello friends ~ I'm posting today for Scrapbook Pal. I was browsing their shop and found these dies that were released in March of this year. The Pop-up Shoppe Dies from Concord & 9th are the cutest ever, and definitely worth revisiting! 


Create your own little mini mall using Pop-up Shoppe Base dies,

Window Shoppe Pop-up Base dies, and all the fun add on dies.

This card uses the Window Shoppe Pop-up Die and the Flower Shoppe Add-on. So cute!!!

This card uses the Pop-up Shoppe Die paired with the Bake Shoppe Add-on.

They also have a Fashion Shoppe and a Book Shoppe.  These pop-up cards are to “die” for!

The great thing about these cards is that they fold flat for easy mailing in an A2 sized envelope.

You can find all the dies listed below at ScrapbookPal:

Concord & 9th Pop-up Shoppe Dies
Pop-up Shoppe Base Die
Window Shoppe Pop-up Dies
Bake Shoppe Add-on
Flower Shoppe Add-on
Fashion Shoppe Add-on
Book Shoppe Add-on


Thanks for stopping by!


Friday, August 18, 2023

Painting A Beautiful Day ~ ScrapbookPal

We are in the midst of repainting the trim, the ceiling and the walls in our dining room. It's been quite a long task, mostly because I'm having a hard time focusing on the inside of the house when I want to be outside when the weather is nice.  It doesn't help that my craft room is always calling my name! It reminded me that I have Spellbinders Paint Your World Dies sitting in my craft room, just aching to be used. 


I created two sweet cards for you, using Spellbinders Artful Tulip, that can be found at ScrapbookPal.


For the first card, I used Pinkfresh Studio Nested Arches to create the focal point, over an A2 sized card panel cut from barnwood printed paper, that I found in my scrapbox. 

On the top arched layer, I blended on Tumbled Glass Distress Oxide Ink and then added some ink splatters using a Ranger Ink Water Brush.

I assembled the Spellbinders Artful Tulip, adding silver mirror cardstock to the band of the paintbrush.  I added some extra flowers from Spellbinders Country Road Garden Builder, in a random pattern along the brush as well.  A bit of string around the handle of the paintbrush finished this card off nicely.  

The sentiments on both cards are from Spellbinders Tiered Tray Sentiments.  I love how you can mix and match all the Spellbinders products so seamlessly.

All these products can be found at ScrapbookPal:

Spellbinders Paint Your World
Spellbinders Artful Tulip
Spellbinders Country Road Garden Builder
Spellbinders Tiered Tray Sentiments
Pinkfresh Studio Nested Arches
Distress Oxide Ink
Ranger Ink Water Brush


*Affiliate disclosure: I only use, review, and blog about products/companies I like and will continue to use. Some of the products shown on my blog use affiliate links. These affiliate links allow me to earn a small commission when products are purchased through those links. *This is at no cost to you! * Please do not feel obligated to use my affiliate links. If you choose to use these links, thank you so much! It helps support my blog and bring new content to you.

Thanks for stopping by!


Saturday, August 5, 2023

Pinkfresh Studio Peony Fantasy ~ ScrapbookPal

Hey there, crafty friends!  There are so many new products that are coming into the ScrapbookPal shop, and I recently had the opportunity to work with these wonderful products from Pinkfresh Studio.

Let me introduce you to Pinkfresh Studio Peony Fantasy!  What gorgeous florals, right??  I made two cards for you today simply because I couldn't decide which colors I liked best.


Here's how I made them:

I started by hot foiling the Pinkfresh Studio Peony Fantasy Hot Foil Plate onto multiple A2 sized smooth white card panels, using the Spellbinders Glimmer Hot Foil System and four different colors of Spellbinders Hot Foil.  

Next, I pulled out some of my favorite colors of Distress Oxide Inks and added color using the Peony Fantasy Stencils and the Ranger Ink Foam Blending Tool.

As you can see I made two panels.  One using cool tones and one in warm tones.  

I cut the finished flowers out using the coordinating Peony Fantasy Die.  I love how easy Pinkfresh Studio makes it so easy to cut all the flowers out at once!  As you can see in the photo, I also cut one panel out that remained uncolored.


 Next, I cut two white card panels using the Spellbinders Infinity Punch & Pierce Plate and mounted them to A2 sized card bases and then played around until I was happy with the design.

The sentiments are from Pinkfresh Studio Foiled Sentiments.  These are a great time saver and wonderful to have on hand.

These cards look like they took a lot of time to make, but they really came together very quickly!

 I hope you've enjoyed todays project and that you're inspired to try your hand at hot foiling and stenciling.  Pinkfresh Studio has so many beautiful designs to choose from.  

Here's a list of products I used today, that can be found at ScrapbookPal:

Pinkfresh Studio Peony Fantasy Collection

Pinkfresh Studio Peony Fantasy Hot Foil Plate

Pinkfresh Studio Peony Fantasy Stencils

Pinkfresh Studio Peony Fantasy Die

Spellbinders Glimmer Hot Foil System

Spellbinders Glimmer Hot Foil

Spellbinders Infinity Punch & Pierce Plate

Distress Oxide Ink


Thanks for stopping by!


Saturday, July 22, 2023

Lawn Fawn How You Bean Seashell Add-on ~ ScrapbookPal

Summer is my favorite season.  Living on the east coast we have rugged rocky coasts and sandy beaches.  One thing I enjoy doing, which I don't do enough, is going to sit by the oceans edge and just be still.

I recently had the pleasure of working with Lawn Fawn's summer release.  My assignment was How You Bean Seashell Add-on Stamps & coordinating Lawn Cuts, through ScrapbookPal.

These stamps and dies are right up my coastal alley!  

Here's how I made my cards:  
I started by stamping all the seashell images onto 80# Neenah Solar White cardstock scraps that I pulled out of my scrap box.  This is a great way to use up some of the smaller pieces of cardstock that are leftover from other projects but are too big to toss away.  I then colored them with Copic Markers.

Next, I die cut them all out using the How You Bean Seashell Add-on Lawn Cuts.  You can see I amassed quite a pile of them. 
 
Next, using the Nuvo Smooth Precision Glue Pen, I randomly applied glue and then sprinkled each shell with Elizabeth Craft Designs Cool Diamond Silk Microfine Glitter.

Card #1:
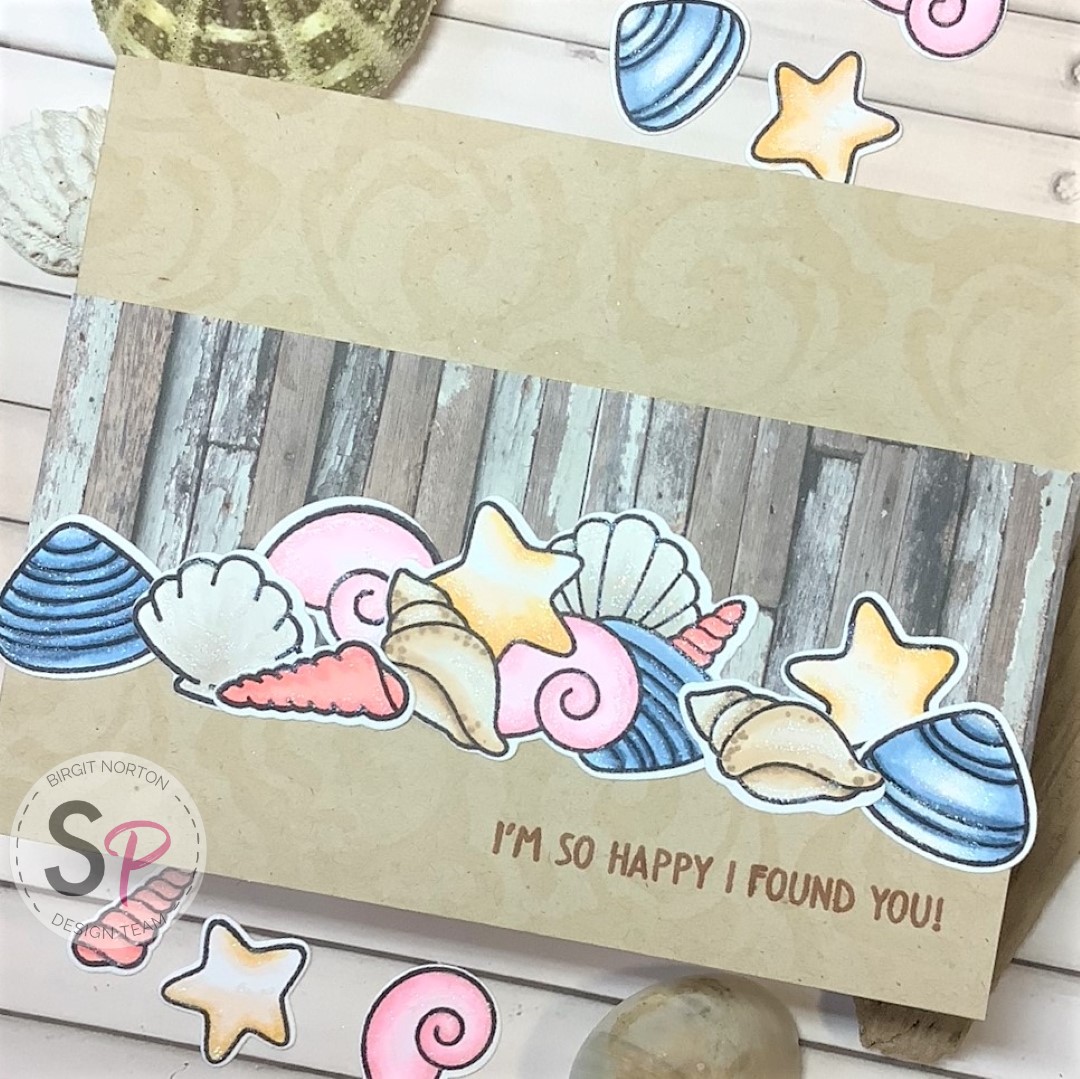
For the first card, I stenciled a very light background onto an A2 sized kraft cardstock base, using a swirly stencil I had in my stash.  I then added a strip of weathered wood design paper and simply layered all the shells along the bottom of the strip.  This image could possibly reflect the results of my collecting seashells all day at the beach.

I stamped the sentiment from How You Bean Seashell Add-on Stamps to the lower right corner.  

Card #2:
I used the Beach Sunset Stencils to create a warm, sunny background for card #2.  I needed enough sand along the bottom of the card panel for the seashells to land, so I slid the cardstock through the sandy part of the stencil so that I could extend the sand, and stenciled on Brushed Corduroy DOX Ink.

I then finished stenciling the rest of the scene using Salvaged Patina, Broken China, Squeezed Lemonade, Mustard Seed, Mowed Lawn and Vintage Photo DOX Inks.

In Focus:
I glued the seashells onto the sand and added flecks of sand using a fine tip brown marker, and stamped the sentiment just above the sunrise.

Two summer cards just perfect for celebrating the all-to-short summer season here on the east coast, and I still have lots of leftover die cut images all ready to use for a future project.

I've linked all the supplies I used below, that can be found at ScrapbookPal.com:
Nuvo Smooth Precision Glue Pen

I hope you'll stop in for a visit at ScrapbookPal, and while you're there check out there New Arrivals and what's Coming Soon.  They also have an extensive line of wonderful products in their Clearance section.

*Affiliate disclosure: I only use, review, and blog about products/companies I like and will continue to use. Some of the products shown on my blog use affiliate links. These affiliate links allow me to earn a small commission when products are purchased through those links. *This is at no cost to you! * Please do not feel obligated to use my affiliate links. If you choose to use these links, thank you so much! It helps support my blog and bring new content to you.


Thanks for stopping by!